LoRA for LLM, PyTorch Tutorial
What is LoRA
LoRA is a method for adapting pre-trained language models that offers several key advantages:
-
Efficiency: LoRA allows fine-tuning large models using significantly fewer parameters compared to full fine-tuning.
-
Low Memory Usage: It requires much less memory and computational resources, enabling training on consumer-grade GPUs.
-
Flexibility: LoRA can be applied to various model architectures like BERT, RoBERTa, GPT, and others.
-
Portability: The resulting LoRA weights are compact and easy to distribute.
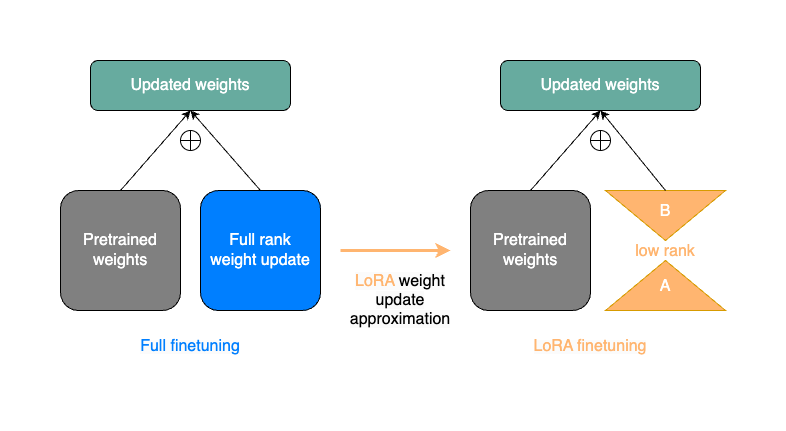
How LoRA Works
The key idea behind LoRA is to use low-rank decomposition to adapt the model:
-
Matrix Decomposition: Instead of updating the full weight matrix during fine-tuning, LoRA decomposes the weight update into two smaller matrices.
-
Low-Rank Approximation: These smaller matrices (A and B) have a lower rank r, which is typically much smaller than the original dimensions.
-
Weight Update: The original weight W is updated as:
W + BA
Where B is of shape (original_output_dim, r) and A is of shape (r, original_input_dim).
-
Trainable Parameters: Only the A and B matrices are trained, while the original weights W remain frozen.
-
Integration: LoRA is typically applied to specific layers of the model, often the attention layers in transformer-based architectures.
-
Forward Pass: During inference, the LoRA weights are added to the original weights:
def forward(self, x: Tensor) -> Tensor:
    lora_weights = torch.matmul(self.lora_matrix_B, self.lora_matrix_A)
    return F.linear(x, self.weight + lora_weights, self.bias)
This allows the model to leverage both the pre-trained knowledge and the task-specific adaptations.
Source: PyTorch
Real example for LLM fine tuning with LoRA (w/ imdb)
Load Dataset
import os
import torch
from datasets import load_dataset
from transformers import AutoTokenizer, AutoModelForSequenceClassification, TrainingArguments, Trainer
from peft import LoraConfig, get_peft_model, PeftModel, PeftConfig
# from sklearn.metrics import accuracy_score, f1_score

# Disable tokenizer parallelism to avoid warnings
os.environ["TOKENIZERS_PARALLELISM"] = "false"

# Load the IMDB dataset
dataset = load_dataset("imdb")
print(dataset)
dataset["train"] = dataset["train"].shuffle()
dataset["test"] = dataset["test"].shuffle()
model_name = "bert-base-uncased"

# Initialize tokenizer and model
tokenizer = AutoTokenizer.from_pretrained(model_name)
num_labels = dataset["train"].features["label"].num_classes
model = AutoModelForSequenceClassification.from_pretrained(model_name, num_labels=num_labels)

# Define tokenization function
def tokenize_function(examples):
    return tokenizer(examples["text"], padding="max_length", truncation=True, max_length=128)

# Apply tokenization to the entire dataset
tokenized_datasets = dataset.map(tokenize_function, batched=True)
tokenized_datasets = tokenized_datasets.remove_columns(["text"])
tokenized_datasets = tokenized_datasets.rename_column("label", "labels")
tokenized_datasets.set_format("torch")

from collections import Counter

label_counts = Counter(tokenized_datasets["train"]["labels"].numpy())
print("Label Distribution:", dict(label_counts)) #  Label Distribution: {0: 12500, 1: 12500}

unique_labels = set(tokenized_datasets["train"]["labels"].numpy())
print("\nUnique Lables:")
print(unique_labels)
-
Import Necessary Libraries: The code begins by importing essential libraries for data handling, model training, and evaluation.
-
Load the IMDB Dataset:
dataset = load_dataset("imdb")This line loads the IMDB dataset using the
datasetslibrary. -
Shuffle the Training and Test Datasets:
dataset["train"] = dataset["train"].shuffle()
dataset["test"] = dataset["test"].shuffle()
Here, both the training and test datasets are shuffled to ensure that the model does not learn any order biases.
-
Initialize the Tokenizer and Model:
tokenizer = AutoTokenizer.from_pretrained(model_name)
model = AutoModelForSequenceClassification.from_pretrained(model_name, num_labels=num_labels)
The BERT tokenizer and model for sequence classification are initialized. The number of labels is set according to the dataset.
-
Define Tokenization Function:
def tokenize_function(examples):
    return tokenizer(examples["text"], padding="max_length", truncation=True, max_length=128)
This function tokenizes the text data, adding padding and truncation as necessary to ensure uniform input sizes.
-
Apply Tokenization to the Entire Dataset:
tokenized_datasets = dataset.map(tokenize_function, batched=True)The tokenization function is applied to the entire dataset in a batched manner for efficiency.
-
Remove Unnecessary Columns and Rename Labels:
tokenized_datasets = tokenized_datasets.remove_columns(["text"])
tokenized_datasets = tokenized_datasets.rename_column("label", "labels")
The original text column is removed, and the label column is renamed to "labels" to match the expected format for training.
-
Set Format for PyTorch Tensors:
tokenized_datasets.set_format("torch")This line sets the format of the datasets to PyTorch tensors, which is required for training with PyTorch models.
-
Check Label Distribution:
label_counts = Counter(tokenized_datasets["train"]["labels"].numpy())
print("Label Distribution:", dict(label_counts))
The distribution of labels in the training set is counted and printed to ensure that both classes are represented. It will be like below
Label Distribution: {1: 12500, 0: 12500}
LoRA Training
# Configure LoRA
lora_config = LoraConfig(
    r=8,
    lora_alpha=32,
    lora_dropout=0.1,
    bias="none",
    task_type=TaskType.SEQ_CLS
)

# Apply LoRA to the model
lora_model = get_peft_model(model, lora_config)

# Set up training arguments
training_args = TrainingArguments(
    output_dir="./lora_imdb_model",
    eval_strategy="epoch",
    save_strategy="epoch",
    num_train_epochs=5, # 1 is good enough
    per_device_train_batch_size=16,
    per_device_eval_batch_size=16,
    dataloader_num_workers=4,
    dataloader_prefetch_factor=2,
    learning_rate=1e-5, # 3e-5 to make learning faster
    weight_decay=0.01,
    fp16=True,  # Enable mixed precision training
    logging_dir='./logs',
    logging_steps=100,
    disable_tqdm=True
)


# Initialize the Trainer
trainer = Trainer(
    model=lora_model,
    args=training_args,
    train_dataset=tokenized_datasets["train"],
    eval_dataset=tokenized_datasets["test"]
)

# Start the training process
trainer.train()

# Save the LoRA model
lora_model.save_pretrained("./final_lora_imdb_model")

# Save the tokenizer
tokenizer.save_pretrained("./final_lora_imdb_model")

# Evaluate the model
final_metrics = trainer.evaluate()
print(f"Final evaluation metrics: {final_metrics}")
This code snippet demonstrates the process of applying LoRA (Low-Rank Adaptation) to a pre-trained model and fine-tuning it on the IMDB dataset. Let's break down the key components:
-
LoRA Configuration:
lora_config = LoraConfig(
    r=8,
    lora_alpha=32,
    target_modules=["query", "key"],
    lora_dropout=0.1,
    bias="none",
    task_type=TaskType.SEQ_CLS
)
This sets up the LoRA configuration with specific parameters like rank (r), alpha, target modules, and dropout rate.
-
Applying LoRA to the model:
lora_model = get_peft_model(model, lora_config)This applies the LoRA configuration to the pre-trained model.
-
Training Arguments:
training_args = TrainingArguments(...)This sets up various training parameters like output directory, evaluation strategy, number of epochs, batch sizes, learning rate, etc.
-
Initializing the Trainer:
trainer = Trainer(
    model=lora_model,
    args=training_args,
    train_dataset=tokenized_datasets["train"],
    eval_dataset=tokenized_datasets["test"]
)
This creates a Trainer instance with the LoRA model, training arguments, and datasets.
-
Training Process:
trainer.train()This starts the training process.
-
Saving the Model:
lora_model.save_pretrained("./final_lora_imdb_model")
tokenizer.save_pretrained("./final_lora_imdb_model")
This saves the final trained model.
-
Evaluation:
final_metrics = trainer.evaluate()
print(f"Final evaluation metrics: {final_metrics}")
This evaluates the model on the test dataset and prints the final metrics.
Key Points:
- LoRA is used to efficiently fine-tune the model by only training a small number of parameters.
- The training process includes both training and evaluation at each epoch.
- Mixed precision training (fp16=True) is enabled for faster training.
- The model is saved after training for future use.
- Final evaluation metrics are computed and displayed.
Inference
# Load the trained model for inference
device = "cuda" if torch.cuda.is_available() else "cpu"

model_path = "./final_lora_imdb_model"
config = PeftConfig.from_pretrained(model_path)
model = AutoModelForSequenceClassification.from_pretrained(
    config.base_model_name_or_path,
    num_labels=num_labels
)
model = PeftModel.from_pretrained(model, model_path)
tokenizer = AutoTokenizer.from_pretrained(config.base_model_name_or_path)

model.eval()
model.to(device)

def predict_sentiment(text, model, tokenizer):
    inputs = tokenizer(text, return_tensors="pt", truncation=True, padding=True, max_length=128)
    inputs = {key: value.to(device) for key, value in inputs.items()}

    with torch.no_grad():
        outputs = model(**inputs)

    predicted_class = torch.argmax(outputs.logits, dim=1).item()

    # Manually map predicted class ID to sentiment label
    return "POSITIVE" if predicted_class == 1 else "NEGATIVE"  # Hardcoded labels

# Test the inference function
test_texts = [
    "I absolutely loved this movie!",
    "The film was boring and too long.",
    "It was good",  # Expected to be positive
    "It was bad"    # Expected to be negative
]

for text in test_texts:
    sentiment = predict_sentiment(text, model, tokenizer)
    print(f"Text: {text}\nPredicted Sentiment: {sentiment}\n")
-
Device Configuration:
device = "cuda" if torch.cuda.is_available() else "cpu"This line checks if a GPU (CUDA) is available. If it is, the device is set to
"cuda"; otherwise, it defaults to"cpu". This ensures that the model runs on the most efficient hardware available. -
Loading the Model:
model_path = "./final_lora_imdb_model" config = PeftConfig.from_pretrained(model_path) model = AutoModelForSequenceClassification.from_pretrained( config.base_model_name_or_path, num_labels=2 # Specify the number of labels for classification ) model = PeftModel.from_pretrained(model, model_path) tokenizer = AutoTokenizer.from_pretrained(config.base_model_name_or_path)- Model Path: The path to the saved fine-tuned model is specified.
- Configuration: The
PeftConfigis loaded from the specified path, which contains necessary configurations for the LoRA model. - Model Initialization: The
AutoModelForSequenceClassificationis loaded using the base model name from the configuration and specifies that there are 2 labels (for binary classification). - LoRA Model Loading: The LoRA model is then initialized with the pre-trained weights.
- Tokenizer Loading: The tokenizer corresponding to the base model is loaded to preprocess input text.
-
Model Evaluation Mode:
model.eval() model.to(device)model.eval(): This sets the model to evaluation mode, which disables dropout layers and batch normalization updates. This is essential during inference to ensure consistent predictions.model.to(device): Moves the model to the specified device (GPU or CPU).
-
Defining the Prediction Function:
def predict_sentiment(text, model, tokenizer): inputs = tokenizer(text, return_tensors="pt", truncation=True, padding=True, max_length=128) inputs = {key: value.to(device) for key, value in inputs.items()} with torch.no_grad(): outputs = model(**inputs) predicted_class = torch.argmax(outputs.logits, dim=1).item() return "POSITIVE" if predicted_class == 1 else "NEGATIVE" # Hardcoded labels- Function Definition: The
predict_sentimentfunction takes in a piece of text along with the model and tokenizer. - Tokenization: The input text is tokenized into tensors suitable for PyTorch using
tokenizer. It applies truncation and padding to ensure uniform input length. - Move Inputs to Device: Each tensor in
inputsis moved to the specified device (GPU or CPU). - No Gradient Calculation: The
torch.no_grad()context manager disables gradient calculation, which reduces memory usage and speeds up computations during inference. - Model Prediction: The tokenized inputs are passed to the model, which outputs logits (raw prediction scores).
- Class Prediction: The predicted class is determined by finding the index of the maximum logit score using
torch.argmax. - Return Sentiment: Based on the predicted class ID (0 or 1), it returns either "POSITIVE" or "NEGATIVE".
- Function Definition: The
-
Testing Inference with Sample Texts:
test_texts = [ "I absolutely loved this movie!", "The film was boring and too long.", "It was good", # Expected to be positive "It was bad" # Expected to be negative ] for text in test_texts: sentiment = predict_sentiment(text, model, tokenizer) print(f"Text: {text}\nPredicted Sentiment: {sentiment}\n")- A list of sample texts is defined for testing purposes.
- A loop iterates over each text in
test_texts, callingpredict_sentimentto get the predicted sentiment. - Finally, it prints out each text along with its predicted sentiment.
Here we have result!
Text: I absolutely loved this movie! Predicted Sentiment: POSITIVE
Text: The film was boring and too long. Predicted Sentiment: NEGATIVE
Text: It was good Predicted Sentiment: POSITIVE
Text: It was bad Predicted Sentiment: NEGATIVE